Configuring Items
Learning objective
By the end of this page you'll be able to configure any item in the GeoE3 tree (indicator, factor, dimension or the top-level analysis) using the one generic pattern that applies at every level, and set up the analysis item's optional population, mask and job-distribution settings.
Every level of the model tree (indicator, factor, dimension, and the analysis itself) is configured the same way. You'll use this pattern dozens of times over the course of a project, so it's worth learning once, generically, before diving into the per-dimension walkthroughs that follow.
The generic pattern
- 🖱️🖱️ Double-click the item to open its configuration dialog.
- 📝 Point it at data (indicators only): pick a layer already loaded in QGIS, browse to a file, or (for OpenStreetMap-backed indicators) click Download from OSM to fetch it directly.
- ⚖️ Assign Weights (factors, dimensions and the analysis): set how much each child item contributes, reflecting your project's objectives. The weights must add up to one; if they don't, the values turn red and you can't confirm the dialog.
- 🚫 Exclude Unused Items: if you don't have data for something, untick its Use checkbox rather than leaving it misconfigured.
- 🔄 Balance Weights: resets every remaining enabled item to an equal share, rather than you typing each value by hand.
- ✅ Click OK to confirm.
- 🖱️ Right-click the item and choose Run Item Workflow.
- ✔️ A green checkmark confirms it completed successfully.
At the indicator level this is often trivial. For factors whose data was already fetched during project setup (Space2Stats downloads, for example), double-clicking the item shows it's already kind of figured out: the tool has already got that data, and it's configured it for you, so you can just say OK. You get a status icon next to it straight away. Work through every indicator the same way, one by one, picking whichever dataset in your project matches what that indicator needs.
Excluding an item you don't have data for
Not every factor will have data available. Fragility, Conflict and Violence (FCV), for instance, needs a source like ACLED, or some other proxy like a crime database, and you might not have access to either. In that case, open the parent item (the dimension, in this example), untick Use next to the factor you don't have data for, and press Balance Weights. That resets every remaining enabled factor to an equal share. Give them all equal weighting, for example, and Active Transport is then considered just as important as Water and Sanitation. The excluded factor shows a greyed-out icon, marking it as not part of the analysis.
Configuring the analysis
The top-level analysis item (the GeoE3 Score) uses exactly the same dialog pattern as a dimension (weights for its three children: Contextual, Accessibility, Place Characterization), plus a handful of extra, optional settings:
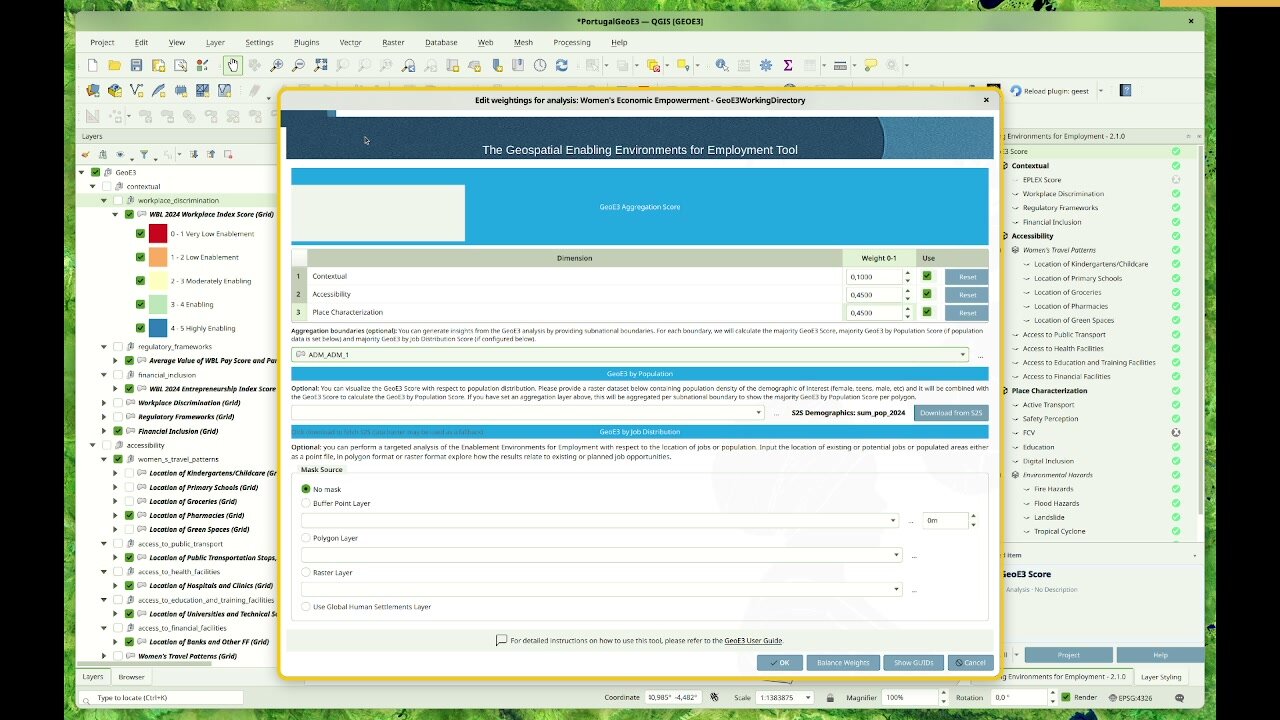
Aggregation boundaries: set this to, for example, Admin 1, and that means you can then break the results down further by subnational units.
Demographics layer: click Download from S2S and it will fetch population data for you, or provide your own (one common source is WorldPop, which has free, open population data if you need a specific year or a breakdown by age and sex). Supplying this combines female population density with the GeoE3 score to produce the GeoE3 by Population output, a comprehensive dataset of 15 classes: 5 enablement levels × 3 population-density tiers (low/medium/high).
Mask: if you're trying to pilot economic upliftment in specific areas, use a mask layer to filter out cells outside that area. The Global Human Settlements layer masks everything to just where it's highly settled, but you can also use your own raster, buffered points, or a polygon layer.
Job distribution (optional): upload job location data as points, polygons or a raster, with a buffer distance for point data, to see how GeoE3 scores relate to existing or planned job opportunities and restrict the analysis to areas of interest.
Once every dimension is configured, head to Running the Analysis to kick the whole thing off.
Recap
- One pattern, every level: double-click to configure, assign weights, exclude what you don't have data for, balance weights, OK, then right-click → Run Item Workflow.
- The analysis item adds optional aggregation boundaries, a population/demographics layer, a mask, and job-distribution data on top of the usual dimension weights.